Revenue Tracking: HubSpot Setup
Last updated: August 5, 2026
This article walks you through setting up Revenue Tracking with HubSpot. Once configured, Charlie automatically tracks when a Charlie-qualified lead’s deal closes in HubSpot — recording both Cash Collected and Contract Value Closed on your Performance Page.
HubSpot Revenue Tracking uses a deal stage trigger: you select which HubSpot Deal stage means a deal is closed, and Charlie listens for Deals that reach that stage.
Prerequisites
A HubSpot account connected to Charlie AI (account-level integration already set up)
At least one Deal pipeline with defined stages in HubSpot
Deal properties available for mapping (Amount, Annual Contract Value, or number-type custom properties)
At least one AI Setter configured in Charlie
Configuration
Step 1 — Navigate to Revenue Tracking Settings
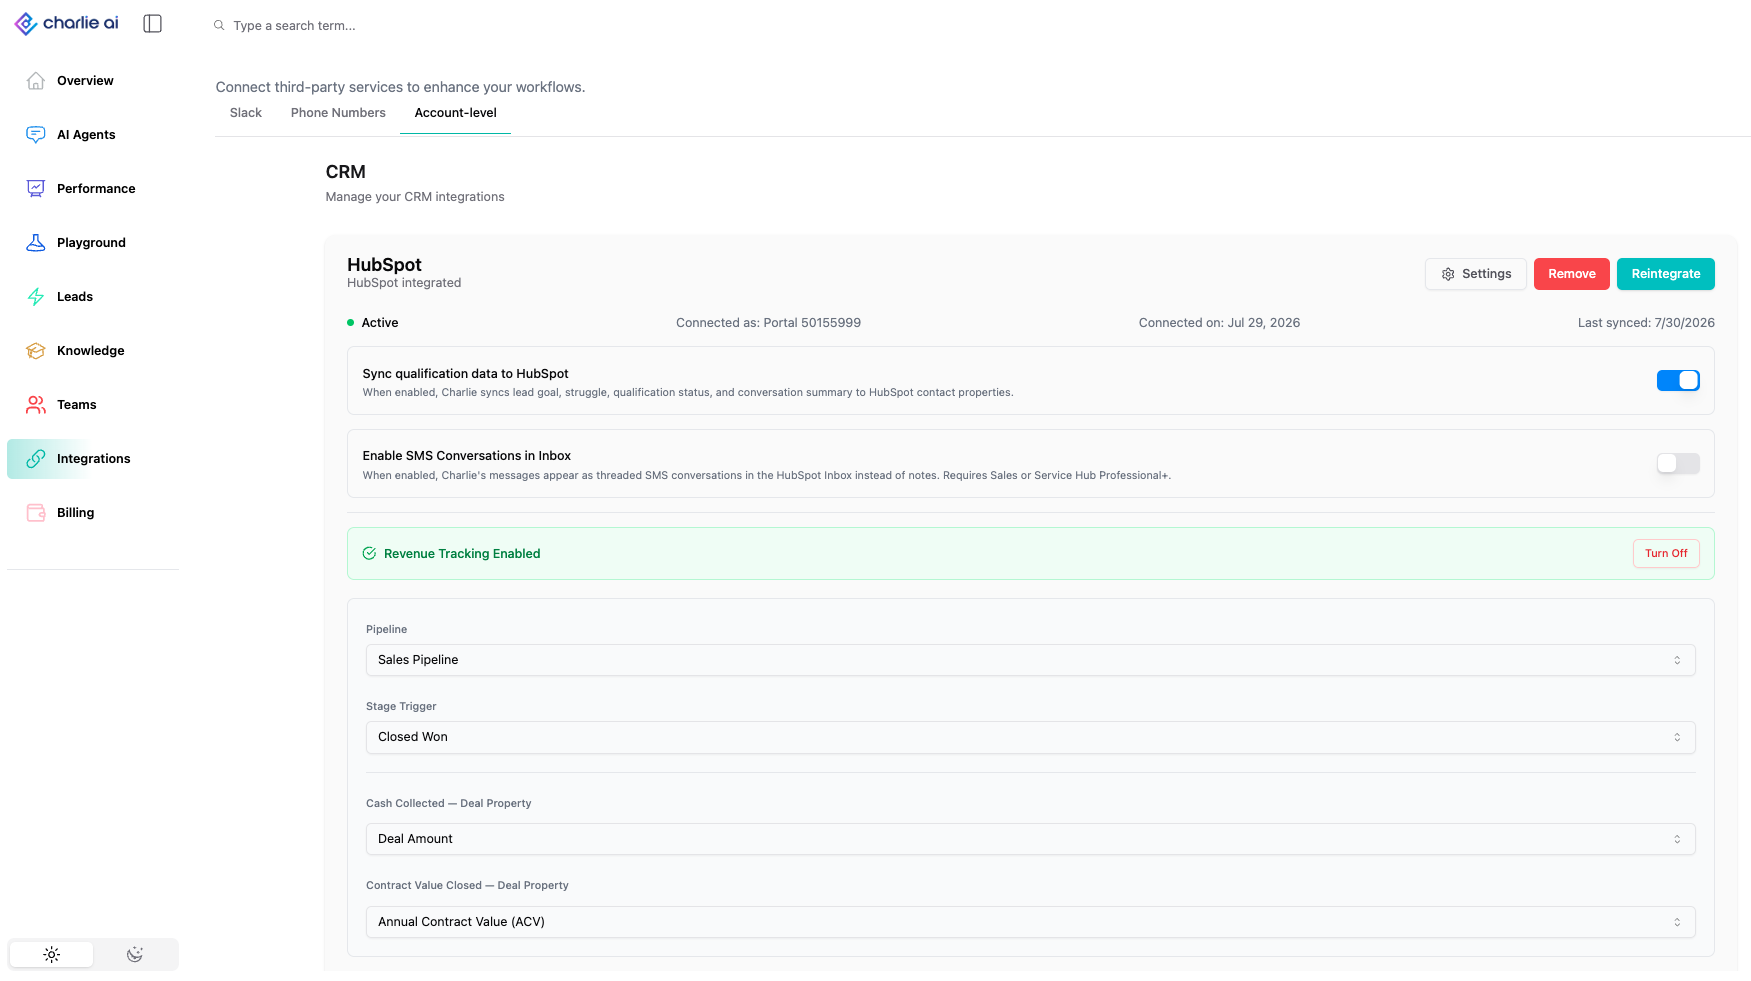
In the Charlie dashboard, go to Integrations from the left-side menu
Find the Hubspot integration card
Click Settings
Select the Revenue Tracking tab
Step 2 — Configure the Pipeline Stage Trigger
The deal stage trigger tells Charlie when to fire a revenue event.
Under Deal Stage Trigger, you’ll see a dropdown populated with all your HubSpot Deal stages
Select the stage that represents a closed deal in your sales process (e.g., “Closed Won”)
When a Deal associated with a Contact reaches this stage and the lead has already reached CTA through Charlie, the revenue event will fire.
Step 3 — Configure Revenue Mappings
You need to map Charlie’s two revenue metrics to HubSpot Deal properties. Each mapping is a single-select dropdown with three options:
Amount — HubSpot’s built-in Deal Amount property
Annual Contract Value — HubSpot’s built-in ACV property
Custom Property — Opens a picklist of all number-type Deal properties in your HubSpot account
Cash Collected Mapping
Under Cash Collected, select from the dropdown: Amount, Annual Contract Value, or Custom Property
If you chose Custom Property, select the specific HubSpot Deal property from the expanded picklist
Contract Value Closed Mapping
Under Contract Value Closed, select from the dropdown: Amount, Annual Contract Value, or Custom Property
If you chose Custom Property, select the specific HubSpot Deal property from the expanded picklist
Important rules:
The same property cannot be selected for both mappings
You can save the configuration with only one mapping selected — both are not required, but at least one must be configured
Tip: If you want to map to a custom HubSpot property, create it first in HubSpot → Settings → Properties → Deal Properties. It must be a number-type property to appear in the picklist.
Step 4 — Save the Configuration
Once you’ve selected the deal stage trigger and at least one mapping, click Save
A notice will appear confirming Revenue Tracking Enabled
The fields become disabled/uneditable and two buttons appear:
Edit — re-enables the fields so you can modify your configuration, then Save or Cancel
Turn Off — disables Revenue Tracking (see below)
Editing Your Configuration
To change your pipeline stage trigger or revenue mappings:
Click the Edit button
The fields become editable again
Make your changes
Click Save to apply, or Cancel to discard changes
Turning Off Revenue Tracking
To disable Revenue Tracking:
Click the Turn Off button
A confirmation modal will appear asking you to confirm
Confirm to disable
How It Works Behind the Scenes
Once configured, Revenue Tracking works automatically:
A lead is activated in Charlie and reaches CTA through one of your AI Setters
The same lead (matched by contact info) has a Deal in HubSpot
When the Deal associated with that Contact reaches your configured trigger stage, Charlie detects the stage change
Charlie pulls the revenue values from the mapped Deal properties
A Revenue Event is created, attributed to the Use Case that most recently triggered CTA
The metrics appear on your Performance Page
Both conditions must be met for revenue to fire:
The lead must have reached CTA through Charlie
The Deal must reach the configured deal stage in HubSpot
If a deal reaches the trigger stage but the associated contact was never a Charlie lead (or never reached CTA), no revenue event is created.
Lead Source Attribution:
When a lead is booked through Charlie, a property update is triggered in HubSpot that includes “Charlie” as the lead source in the CRM record. This helps you identify which deals originated from Charlie even outside of the Revenue Tracking metrics.
Tips & Best Practices
Choose the right trigger stage — Pick the deal stage that definitively means the deal is won. “Closed Won” is the most common choice. Avoid stages that are too early in the pipeline.
Understand Amount vs. ACV — If your deals are one-time payments, “Amount” is usually the right mapping for Contract Value Closed. If your deals are recurring contracts, “Annual Contract Value” may be more appropriate.
Use Custom Properties for flexibility — If your HubSpot setup uses custom deal properties for revenue tracking (e.g., “Total Payment Received” or “Signed Contract Amount”), map those custom properties instead of the built-in ones.
Populate deal values before closing — The revenue values are pulled from HubSpot at the time the deal reaches the trigger stage. Make sure the Amount or custom property values are filled in before moving the deal to your trigger stage.
Test with a single deal — Activate a test lead through Charlie, run it through CTA, create a Deal in HubSpot for that contact, then move it to your trigger stage. Verify the revenue appears on the Performance Page.